Javascript
Hands-on JavaScript projects and guides for building interactive websites.

Many beginner developers notice a strange issue as their projects grow:
typing in inputs feels slow
scrolling becomes laggy
the browser freezes on mobile
APIs get called too many times
The code is correct, but the user experience is bad.
The root cause is usually uncontrolled event execution.
In this article, you will understand:
why this problem happens
what debounce and throttle really solve
how to implement them properly
which one to use and when
all with real UI examples and clean code
Browsers fire some events continuously.
Example:
window.addEventListener('scroll', () => {
  console.log('scrolling');
});
What actually happens:
this function runs dozens of times per second
JavaScript blocks the main thread
UI updates get delayed
animations stutter
mobile devices suffer badly
This problem commonly appears with:
search inputs
resize events
scroll-based animations
button spam clicks
We need a way to control execution frequency.
Two Different Solutions for Two Different Problems
This is where developers get confused.
Problem Type | Correct Solution |
|---|---|
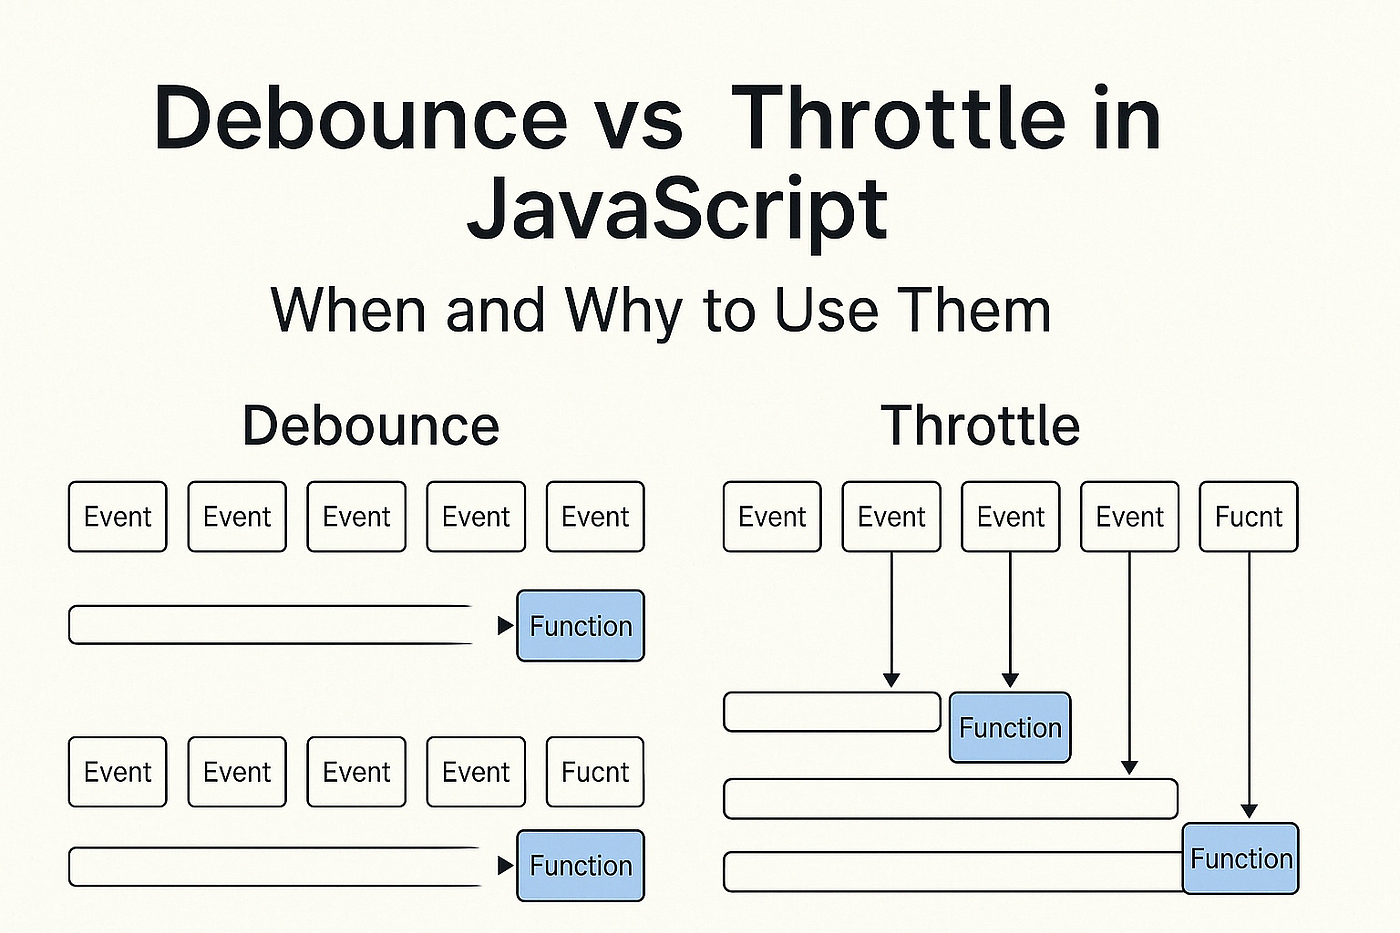
Run code after user stops | Debounce |
Run code at fixed intervals | Throttle |
They solve different problems, not the same one.
Imagine a search input connected to an API.
Bad implementation:
API call on every keystroke
unnecessary network requests
server overload
poor typing experience
Debounce ensures:
“Only run this logic after the user pauses.”
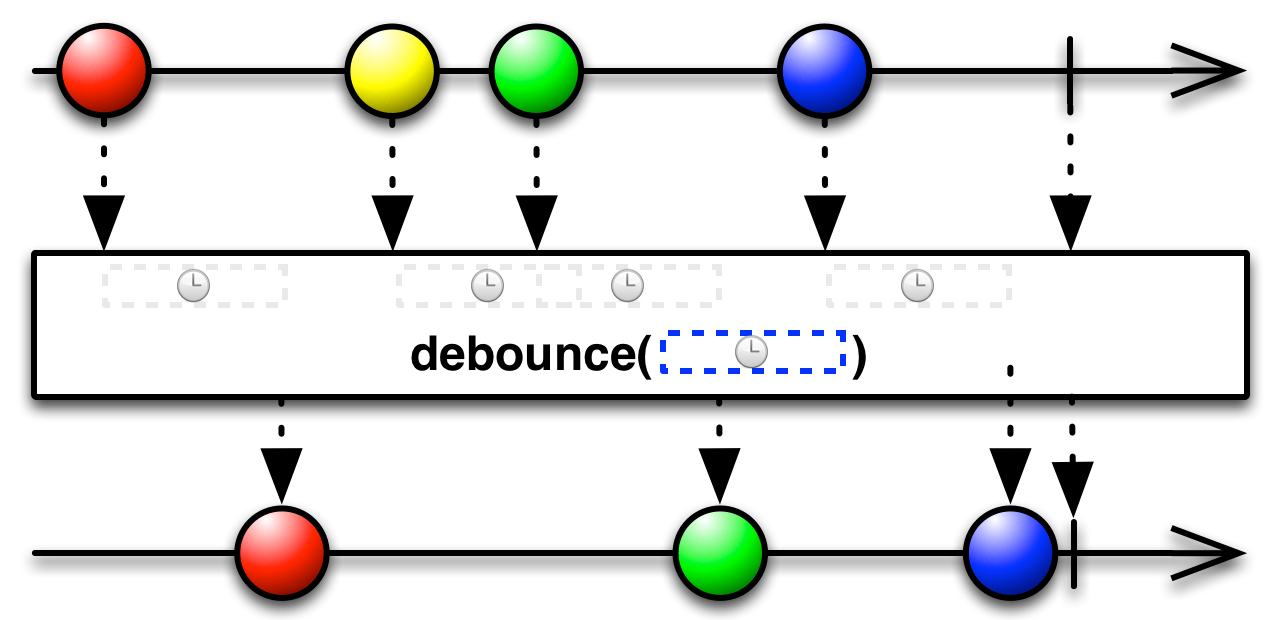
User triggers an event
A timer starts
If the event triggers again → timer resets
Function runs only once, after delay
This makes debounce perfect for inputs.
function debounce(callback, delay) {
  let timer;

  return function (...args) {
    clearTimeout(timer);

    timer = setTimeout(() => {
      callback.apply(this, args);
    }, delay);
  };
}
timer stores the timeout reference
clearTimeout(timer) cancels previous execution
setTimeout() schedules new execution
apply(this, args) preserves context and arguments
function runs only after delay ends
<div class="search-box">
  <input type="text" id="searchInput" placeholder="Search products..." />
  <p id="status">Start typing...</p>
</div>
.search-box {
  max-width: 400px;
  margin: 40px auto;
  font-family: sans-serif;
}

.search-box input {
  width: 100%;
  padding: 12px;
  font-size: 16px;
}

.search-box p {
  margin-top: 10px;
  color: #64748b;
}
const input = document.getElementById('searchInput');
const status = document.getElementById('status');

const handleSearch = debounce(() => {
  status.textContent = 'Searching API...';
}, 500);

input.addEventListener('input', () => {
  status.textContent = 'Typing...';
  handleSearch();
});
user types → no API call
user pauses for 500ms → search executes once
UI feels smooth and responsive
✔ prevents excessive API calls
✔ improves typing experience
✔ reduces server load
✔ ideal for forms and inputs
Scroll and resize events must update continuously, but not excessively.
Example use cases:
scroll progress bar
infinite scrolling
window resize handling
drag events
Throttle ensures:
“Run this logic once every X milliseconds, no matter what.”
First event executes immediately
Further events are ignored
Execution allowed again after delay
function throttle(callback, limit) {
  let canRun = true;

  return function (...args) {
    if (!canRun) return;

    callback.apply(this, args);
    canRun = false;

    setTimeout(() => {
      canRun = true;
    }, limit);
  };
}canRun controls execution permission
function runs immediately on first event
further calls are ignored
execution resets after delay
<div class="progress-bar" id="progressBar"></div>.progress-bar {
position: fixed;
top: 0;
left: 0;
height: 4px;
background: #2563eb;
width: 0%;
}const bar = document.getElementById('progressBar');
window.addEventListener(
'scroll',
throttle(() => {
const scrollTop = window.scrollY;
const docHeight =
document.documentElement.scrollHeight -
window.innerHeight;
const progress = (scrollTop / docHeight) * 100;
bar.style.width = progress + '%';
}, 100)
);updates feel smooth
browser is not overloaded
works well on mobile
UI remains responsive
Feature | Debounce | Throttle |
|---|---|---|
Trigger | After user stops | Fixed interval |
Best for | Search, input | Scroll, resize |
API calls | Minimal | Controlled |
UX | Smooth typing | Smooth scrolling |
❌ Using debounce for scroll
❌ Using throttle for search input
❌ Forgetting delay tuning
❌ Running heavy logic inside event handlers
faster UI
smoother animations
better mobile performance
cleaner code
production-ready applications
Debounce and throttle are not optional optimizations.
They are essential tools for any serious frontend developer.
Once you master them, you’ll immediately notice:
fewer bugs
better performance
more professional UI behavior
Happy Coding ! 🚀


Comments